Thursday, April 22, 2010

French Cupcakes or Bouchees Chocolat au Yaourt


So I kinda have this thing with Paris. I can honestly tell you that I've been in love with Paris for more than half my life. Ever since 6th grade when Ms. BlahBlah gave us our annual country project. I don't remember exactly how it was done. I think we drew for position and then got to pick our country. All I know is that I got France and it was then my love affair with all thing French began.

In high school my friends convinced me to take Latin and I eagerly agreed as a) I wanted to hang out with my friends and b) thought I was going to be a lawyer and Latin seem like a good idea. In college when I had to pick a language I naturally went with Francais. Je voulais français! A couple years later and I could only parle un peu
français. Then I came across a book, a wonderful book, a gift from the gods. I began reading The Sweet Life In Paris by David Lebovitz and I fell in love again.

The Sweet Life In Paris is a great book. Even if you are only a casual reader I would recommend it 100%. David weaves recipes and stories together in a magical way. And the recipes, oh wow, the recipes. If nothing else, oh the recipes- they are très excellent!


Bouchees Chocolat au Yagourt (Chocolate Cupcakes)
by David Lebovitz, The Sweet Life in Paris

7 oz Semi-sweet chocolate chips (or chopped)
1/2 cup vegetable oil
1/2 cup Greek yogurt (or plain whole-milk if you prefer)
1 cup sugar
3 large eggs, at room temperature
1 teaspoon vanilla extract
1/2 teaspoon almond extract
1 1/2 cups all purpose flour
1 1/2 teaspoon baking powder
1/2 teaspoon coarse salt

Preheat oven to 350 F. Grease a 12 cup muffin pan. In a double broiler melt the chocolate with 1/4 c of the oil until smooth. In another bowl, mix the remaining 1/4 cup oil with the yogurt, sugar, eggs, vanilla and almond extract. In a larger bowl combine the flour, baking soda, and salt, whisking to combine.

Make a well in the center of the flour mixture and pour in the yogurt mixture. Stir a couple of times and add the chocolate, stirring just until combines. Pour batter into the muffin pan and bake for 25 minutes. Remove from oven and cool (though I can never wait until they are cool, I dare you to try).


Note: No matter how healthy you want to be, do not substitute apple sauce for the oil. The first time I made these with Kenz we did just that and these cupcakes are about 1000x better with oil. Trust me.
Friday, April 16, 2010

A celebration of friends and springtime


Dinner parties, my specialty. No really I love to have friends over for dinner, to each delicious foods and to drink wine. So a few weekends ago (sorry this is a late post), I had my two bestest (is that a word?) friends over for dinner and a movie. We watched The Time Travelers Wife (such a beautiful story).

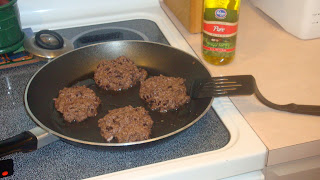
We decided to celebrate the start of spring and eventually summer. So our entree of the night was black bean burgers, Molly's potato salad (see previous blog) and a spring salad. I love black bean burgers (I am the vegetarian in the title of the blog), but I have never made them before. So I decided I was up for the challenge. So I set my sights on to The Food Network and found an easy, yet delicious recipe.

I am going to be honest, this was a delicious burger.
Happy Cooking :)

Food Networks Black Bean Burgers

Ingredients

1/2 medium yellow onion, roughly chopped

1 tablespoon chopped garlic

2 (15-ounce) cans black beans, rinsed and drain

d, divided

2 tablespoons freshly chopped cilantro leaves

2 teaspoons freshly chopped parsley leaves

1 egg

1/2 teaspoon red pepper flakes

1/2 cup bread crumbs

Salt and fresh ground black pepper

4 hamburger rolls

Optional Toppings:

1 tomato, sliced

4 small Romaine lettuce leaves, or any other type you have on hand

1/4 cup ketchup

Directions

Heat a grill or grill pan over medium-low heat

In a food processor, pulse onion and garlic until finely chopped. Add 1 can black beans, cilantro, parsley, egg, and red pepper flakes and pulse to combine.

Transfer mixture to a large mixing bowl, add the remaining can of black beans and the bread crumbs. Season with salt and pepper, to taste, and mix until well combined

Reserve 1/3 of the black bean mixture for Round 2 Recipe. Divide remaining

mixture into 4 portions and form into patties. Place on hot oiled grill over medium-low heat and cook about 6 minutes a side or until heated through. Toast hamburger buns on a grill. Place a burger on the bottom of each bun. Top with lettuce, tomato and ketchup. Cover the burgers with the top of the bun and serve.

Sorry my pictures are out of order, I am still in the learning process of how you use this!!!

Sunday, March 14, 2010

Molly's Potato Salad- Yum, Yum!

Have I ever told you about how I developed my love of baking or my obsession with baking? It's all in the interpretation. One day back in 2006 I was perusing the Internet and i came across a blog. In typically me fashion I developed an almost unhealthy obsession with this one blog that i read constantly, my blog reading slowly dwindled until Then by luck out of luck I stumbled upon Orangette and it changed everything. After reading an entry about Baked Pasta I feel in love and each week I would eagerly await a new post and head immediately to the kitchen to whip up whatever Molly was blogging about. (Did I mention its Molly who authors the blog, that would be helpful information eh?) Fast forward a year and a half and Molly publishes a memoir style cookbook. Needless to say I immediately ran out and purchased it, read it as quickly as possible and began cooking.

The very first recipe in A Homemade Life is for potato salad. Now normally I'm not a big potato salad kinda girl, drop me into a spring time picnic and I'll eat it but I'm not going to declare my undying love. I'm a very picky eater and I prefer potato salads that aren't super mustardy. I passed over the recipe for Burg's Potato Salad until last spring when it started to warm up and I had the strongest craving for potato salad. I called picked up some hamburger, called my roommate Laura and got started. I've been obsessed with this potato salad ever since. For a good three months last super I would make it every Tuesday night and bring it with me when I drove out to see my parents on Wednesday nights.

As soon as it began to warm up a couple weeks ago I decided that I absolutely had to make Burg's Potato Salad. A dinner party was in the works and when hamburgers (or black bean veggie burgers as it was) became the main fair I decided to make potato salad asap. Needless to say this potato salad is practically life changing. It takes considerably more time to make then buying a container of that nasty stuff they make at the store but it is much, much better. And it tastes considerably better on the second day after the flavors have some time to blend. Get cooking kiddies, you're gonna love this.

Burg's Potato Salad

from A Homemade Life by Molly Wizenberg


2 pounds of red potatoes
4 large eggs
8 scallions (white and pale green parts only) thinly sliced
1/4 tsp salt
3/4 c mayonnaise
4 tbsp Ranch dressing
2 tbsp dill, finely chopped

Put the potatoes in a large pan and add cold water to cover by 1 inch. Add a dash salt, and bring to a boil over medium-high heat. Reduce the heat to maintain a gentle simmer and cook, until the potatoes are tender, about 15 minutes. Drain them and rinse with cold water. Set them aside to cool. (I normally put them in the fridge to speed things up, but I'm not a very patient person either). When the potatoes are cool, cut them into 1 inch chunks and put them into a large bowl.

While the potatoes are cooking plane the eggs in a small saucepan and add cold water to cover. Now listen carefully and trust Molly completely. Bring eggs to a boil over medium-high heat. When the water begins to boil remove the pan from heat, cover it and let the eggs sit it the water for exactly 12 minutes (seems anal retentive but trust Molly, trust!) Immediately rinse the eggs in cold water. When they are cool peel them chop coarsely and add to the potatoes. Add the scallions and salt, then mix together.

In a small bowl combine the ranch, mayonnaise and dill. Pour the dressing over the potatoes and mix coating equally. You may wanna add some salt. Cover and refrigerate overnight. Enjoy!

Thursday, February 18, 2010

Fortune Cookies


Now before we get started I will warn you, our fortune cookies did not turn out- they looked fabulous but well... the taste part was lacking. The recipe was suppose to make 24 and we ended up with 9- I'm gonna call that Problem A. Problem B- these things seemed relatively healthy- I mean, how can you succeed when you use egg whites- I think the kitchen gods were against us. Or maybe it's my obvious lack of Chinesseness, maybe we'll try again later, maybe I hate writing fortunes and don't plan on repeating this ever again, or maybe you'll make these despite my obvious bias against them (sorry Kenz). Either way it was fun and that's why I bake (I got over that baking for boys thing months ago, such an obvious fail). I bake to hang out with my girl friends, beat the shit out of some eggs and consume large quantities of chocolate. And I achieved all so I'm gonna call it a success.

If you so choose to make fortune cookies you can be all cute and write little personalized notes and dip them in chocolate and add sprinkles and pretty much full fill every ten year-olds dream. The cookies are super easy (but then again mine were a total flop, haha). Make sure you give yourself time to let the batter chill for an hour in the fridge before you get started or you may consume half a bag of Sweedish Fish (don't judge- there were 3 of us). The decorating is the best part but i like to dip things in chocolate and after the fortune fail began dipping pretzels which was fabulous- I love sweet and salty, it's down right addictive.

Homemade Fortune Cookies
(adapted from Cooking Light and www.ourbestbites.com)

1/2 C flour- If you have bread flour, use it.
1/2 C sugar
1/2 tsp almond extract
1/2 tsp vanilla extract
2 egg whites

Place all ingredients in a food processor and blend to combine. Place in a container and chill 1 hour.

Preheat oven to 400°.Cover a baking sheet with parchment paper*. Draw 3-4 (3-inch) circles on paper. Turn paper over (If you don't the pencil will be on your cookie). Spoon 1 teaspoon batter into center of each of the drawn circles; spread evenly to fill circle.

Bake at 400° for 5-6 minutes or until the cookies are brown just around the edges and a little toward the centers. Remove from the oven. Let sit for a few seconds before removing from pan. Working quickly, loosen edges of cookies with a spatula, and turn over

Place fortune along the center of 1 cookie. Fold cookie over so the edges meet ; press edges together. Gently pull the ends of the cookie down over the rim of a small bowl (or jar); hold for a few seconds or until set. Repeat procedure with remaining cookies. Makes about 24 cookies.

For some really fun dip them in melted chocolate and add sprinkles!

Thursday, February 11, 2010

Thank You Sweet Amandine

Sweet Amandine, my favorite baking blog!! LOVE IT.
They have so many wonderful recipes that will warm you up on a blissful day!
Last Sunday Amy, Jess and I decided to have our little baking day. We decided we were due for a good girls day, and what better way to celebrate a friendship is with baking!!!

Jess found this delicious recipe for Salted Chocolate Almond Toffee. It was fabulous. And it was actually super, super easy!! I highly recommend it to all of you. The only problem is that it is super addicting. I actually finished my piece for breakfast. HA

Get ready, set, BAKE.....
Salted Chocolate Almond Toffee (Sweet Amandine)

2 c. sliced almonds

1¾ c. sugar

3 T. water

½ c. unsalted butter

1 t. Blackstrap or other dark molasses

¼ t. sea salt, plus another 2-3 generous pinches for finishing

1 t. vanilla extract

¼ t. baking soda

5 oz. bittersweet chocolate, coarsely chopped

Preheat the oven to 350 degrees. Spread the almonds evenly on a baking sheet and toast until golden brown, 7 to 10 minutes. Let cool completely.

Line a baking sheet with parchment paper or a nonstick liner, and evenly spread half of the almonds on top. There should be no visible parchment paper between the almonds. Reserve the remaining almonds for topping.

Combine the sugar, water, butter, molasses, and salt in a medium, heavy saucepan. Place over medium heat and cook, stirring occasionally, until the mixture registers 295 degrees – no more, no less – on a candy thermometer. Depending on your heat and your pot, it will take anywhere from 5 to 10 minutes. Immediately remove the pot from the heat and stir in the vanilla and baking soda. Stir well, until fully incorporated. The mixture will bubble up when you add the baking soda, so take care.

Pour the hot mixture evenly over the almonds. Work quickly, as it will begin setting up immediately. If necessary, use a lightly-oiled rubber spatula to spread the toffee. When the toffee is just cool enough to touch, spread the chopped chocolate over top. As the chocolate melts from the warmth, use a spatula to spread it across the toffee. Sprinkle the rest of the almonds, and then a couple of pinches of sea salt over the chocolate to finish. Let cool completely. (I’ve been known to speed things up by sliding the pan into the refrigerator.)

Break the cooled sheet into pieces. The toffee will keep in an airtight container in a cool, dry place for several weeks. Do not freeze.

Yield: About 1½ pounds.

Saturday, January 23, 2010

Girls Night!!!


Tonight is our infamous girls night. Seriously I love girls night . I love the idea of going out with my ladies and not having to impress a boy ( or maybe to impress the waiter :)) My girls are the type that are always there for you no matter what. Seriously I think these girls know me better then I actually know myself.

Tonight= little black dress, tights, heels, wine and brownies. I love getting dressed up for the girls. Tonight though is a very special night. My best friend/ roommate from college got engaged a few weeks ago and we are CELEBRATING!!

So I of course made brownies. Now these are not the typical chocolate brownies that everyone is used to. These are Blonde Brownies with Cranberries and White Chocolate Chips. Seriously the best brownies ever. And not only are they the best brownies ever, but the brownie mix is highly addictive. You always know when you have a good recipe if the mix is yummy. This recipe is complements of my beautiful friend Brittany Orcutt!!!

Blonde Brownies with Cranberries and White Chocolate-350 degrees

½ c margarine

2c packed brown sugar

2 eggs

1 ½ c flour

2 tsp baking powder

¾ tsp salt

1 tsp vanilla

½ c dried cranberries

½ c white chocolate chips

Heat oven 350. Beat margarine and sugar. Add eggs and vanilla, beat till smooth. Add dry ingredients. Add cranberries and white chocolate chips. Spread into a greased 9X13 pan. Bake for 25-30 minutes. Do not over bake. When cooled Drizzle with glaze (powder sugar and milk).


Note: It is very hard to get out of the pan, even if you sprayed it! So since mine looks atrocious a fellow blogger/friend and I dipped them into chocolate. Just melt chocolate and dip'em!!

Wednesday, January 20, 2010

Best Chocolate Chip Cookies Ever! (Seriously!)


There is one food I have been making for years and years, literally, and that's chocolate chip cookies. It started in ninth grade home ec when my teacher Mrs. I had us make homemade chocolate chip cookies. I adore chocolate chip cookies and they are on of my favorite guilty pleasures- No matter how dreary the day chocolate chip cookies just seem to make everything better. For years and years I had always used the recipe off of the back of the Toll House bag. It was decent enough and I always got great reviews when I made the cookies for others. Then in a moment of sheer culinary delight I found Michelle, the Brown Eyed Bakers, chocolate chip cookie recipe on her site.

I am super picky about my chocolate chip cookies, I like them chewy but thick and heavy and a little crusty on the edges. Before this recipe my favorite chocolate chip cookie was the Triple Chocolate Chunk Cookie at Starbucks, I'd rate my consumption level in the hundreds, though I always felt a little disdain towards the milk chocolate chips in there- they just didn't belong. After making Michelle's recipe I can say with 100% certainty that I will not be buying my cookies at Starbucks I will be making them myself. I have a dozen of these cookies at home that I'm getting ready to send out and I'm making another batch tonight. Yes, these are that good.

Thick and Chewy Chocolate Chip Cookies
(Source: Baking Illustrated, page 434 via www.thebrowneyedbaker.com)

Makes about 18 large cookies.

These cookies are absolutely fabulous. Michelle advises that you weigh your ingredients which I do as I got a kitchen scale for Christmas, but even if you don't have a scale don't let that scare you away. Measured or weighed these cookies are fabulous.

2 cups plus 2 tablespoons (10 5/8 ounces) all-purpose flour
1/2 teaspoon baking soda
1/2 teaspoon salt
12 tablespoons (1 1/2 sticks) unsalted butter, melted and cooled until warm
1 cup packed (7 ounces) light or dark brown sugar
1/2 cup (3 1/2 ounces) granulated sugar
1 large egg plus 1 egg yolk
2 teaspoons vanilla extract
1-1 1/2 cups semisweet chocolate chips

1. Adjust the oven racks to the upper- and lower-middle positions and heat the oven to 325 degrees. Line 2 large baking sheets or spray them with nonstick cooking spray. (The rack positioning is weird I know- but trust me here and do it).

2. Whisk the flour, baking soda, and salt together in a medium bowl; set aside.

3. Mix the butter and sugars until thoroughly blended. Beat in the egg, yolk, and vanilla until combined. Add the dry ingredients and beat at low speed just until combined. Stir in the chips to taste.

4. Roll a scant 1/4 cup of the dough into a ball. Hold the dough ball with the fingertips of both hands and pull into 2 equal halves. Rotate the halves 90 degrees and, with jagged surfaces facing up, join the halves together at their base, again forming a single ball, being careful not to smooth the dough’s uneven surface. Place the formed dough balls on the prepared baking sheets, jagged surface up, spacing them 2 1/2 inches apart.

5. Bake until the cookies are light golden grown and the outer edges start to harden yet the centers are still soft and puffy, 15 to 18 minutes, rotating the baking sheets front to back and top to bottom halfway through the baking time. Cool the cookies on the sheets. Remove the cooled cookies from the baking sheets with a spatula.

Enjoy!

-Jessica